|
|
| |
|
1258thebus |
 General Member General Member |

|
 United States of America
 |
| |
| Joined: 7/19/2008 |
|
Posts: 49 |
| |
|
| |
| Posted: Saturday, August 18, 2012 at
4:14:15 PM |
IP Logged |
|
I've studied Homeboy's excellent How To Make a Retaining Wall tutorial, and I'm really having a hard time making it work. I end up with wrinkles, and am unable to shrink the wall texture -which one is best to use? Am I correct in assuming these are the right steps, starting from a flat piece of terrain?
1. Make a small, flat water feature/pond.
2. Drop the feature, then use it as a shape. Enlarge the shape 3". Drop it.
3. Pick up the two shapes, then lower them using bunker tool desired depth- say 2'.
4. If necessary, flatten pond to minimum. Smooth if needed.
5. Use the 3" enlarged shape as a shape; enlarge it 3".
6. Pick up two 3" shapes; lower with bunker tool say 2'- whatever the desired height of the wall is.
7. Select wall shape; drop into place; repeat. Again, which is the best shape to use from the Walls and Stuff library? The first one (which seems to be the smallest)? How do you reduce the size of these shapes?
Thanks for any help! These seems very complicated, but I'd like to be able to add it to my course design attempts. |
| |
| |
|
|
| |
|


|
| |
|
Munroco |
|
General Member |
|
|
 Scotland
 |
| |
| Joined: 10/8/2008 |
|
Posts: 433 |
| |
|
| |
| Posted: Saturday, August 18, 2012 at
5:48:47 PM |
IP Logged |
|
| edited by: Munroco on
Saturday, August 18, 2012 at
5:58:00 PM
|
| |
The real Step 1 . Ensure the terrain surrounding your pond is dead flat for at least 3 foot outside the pond shape
1. Correct
2. Correct, Its a good idea to make the retaining shape a texture that contrasts with the pond and the surround for now, so you can see what your doing.
3. correct up to a point. if I was using this method I wouldnt use the bunker tool, Id use the 2 shape method. Also I wouldnt pick the shapes up, I would use them both as shapes. The way I would do it would be to use the pond as a shape, make a hill down the depth you want the pond, then flatten it to minimum. This should give you a nice sharp edge.
4. correct up to a point again. see above. Dont smooth.
5. correct if you want a extra buffer shape, in which case you would do that before step 3 (;not really necessary IMO.
6. Dont know why you would do this?
7. Select wall shape. I personnally like Judds walls as they have lots of different curves and you can always find one to fit. There is no need to reduce (;or enlarge) the size of the shapes, Just lower them to the same level as your surrounding terrain.
once your happy with the wall, change the course view to not whow objects and change the 2nd texture to the same as the surround. The key to good retaining walls is getting the elvations right before you start dropping the wall shapes in.
Hope this helps.
BTW youd probably be better posting queries under course source which designers tend to check out more often.
Cheers
Neil |
| |
| |
|
Munroco Signature |
|
| From Carnoustie, the REAL home of golf. |
|
| |
|
|
| |
|
|
|
| |
|
axe360 |
|
General Member |
|
|
|
United States of America |
| |
| Joined: 3/2/2005 |
|
B-Day: 3/26/1960 (65) |
|
Posts: 1,688 |
| |
|
| |
| Posted: Saturday, August 18, 2012 at
5:51:27 PM |
IP Logged |
|
| edited by: axe360 on
Saturday, August 18, 2012 at
7:02:00 PM
|
| |
|
| |
| |
|
|
| |
|
|
|
| |
|
Munroco |
|
General Member |
|
|
|
Scotland |
| |
| Joined: 10/8/2008 |
|
Posts: 433 |
| |
|
| |
| Posted: Saturday, August 18, 2012 at
5:59:05 PM |
IP Logged |
|
better check again Axe, I just edited it as I missed some stuff.
|
| |
| |
|
Munroco Signature |
|
| From Carnoustie, the REAL home of golf. |
|
| |
|
|
| |
|
|
|
| |
|
1258thebus |
|
General Member |
|
|
|
United States of America |
| |
| Joined: 7/19/2008 |
|
Posts: 49 |
| |
|
| |
| Posted: Saturday, August 18, 2012 at
6:28:23 PM |
IP Logged |
|
| Thanks Neil, I'll give it a try! |
| |
| |
|
|
| |
|
|
|
| |
|
axe360 |
|
General Member |
|
|
|
United States of America |
| |
| Joined: 3/2/2005 |
|
B-Day: 3/26/1960 (65) |
|
Posts: 1,688 |
| |
|
| |
| Posted: Saturday, August 18, 2012 at
7:52:32 PM |
IP Logged |
|
| edited by: axe360 on
Saturday, August 18, 2012 at
7:59:00 PM
|
| |
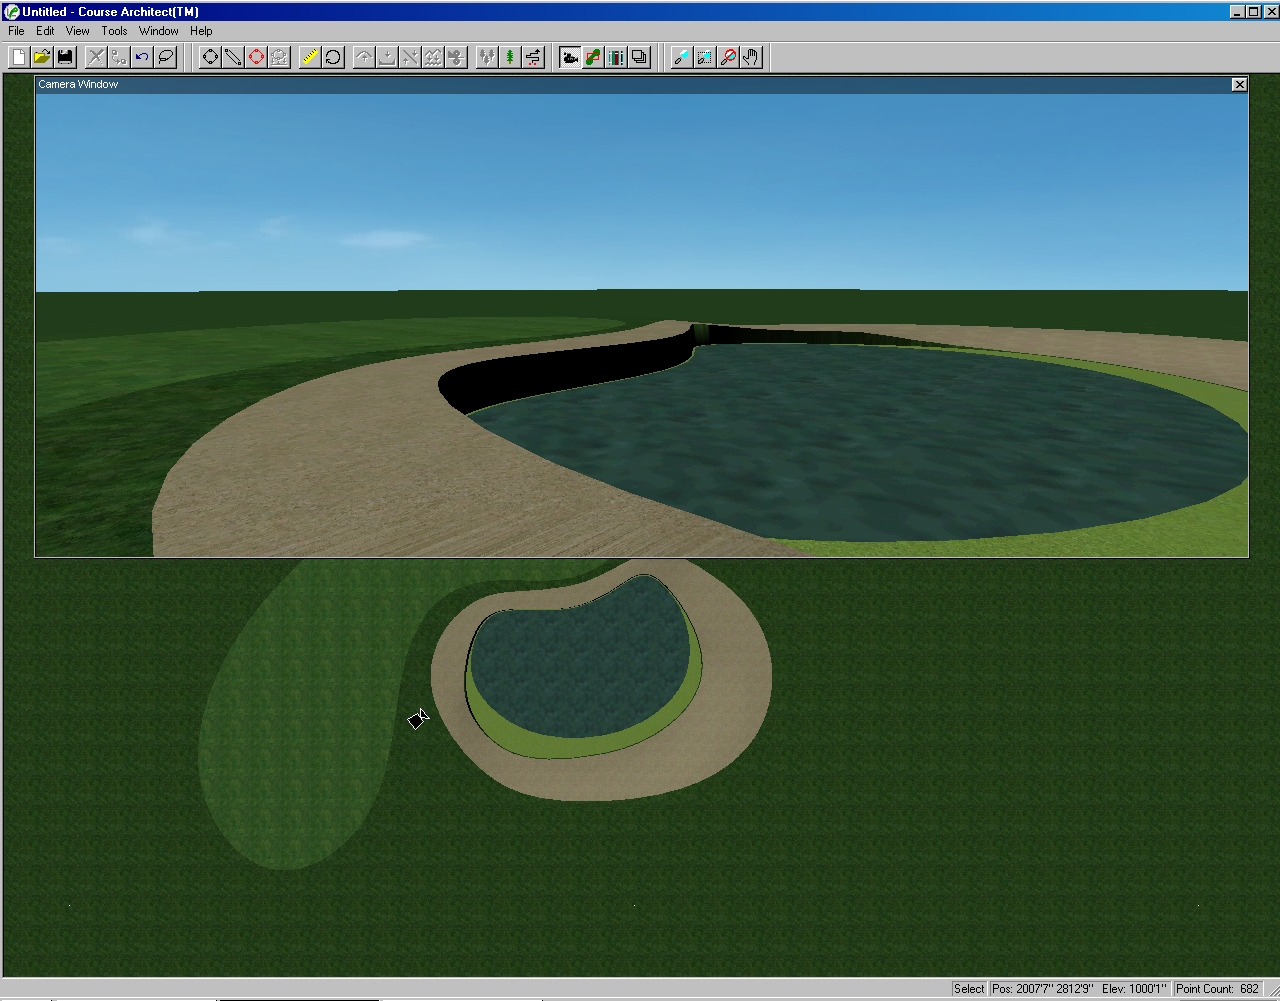
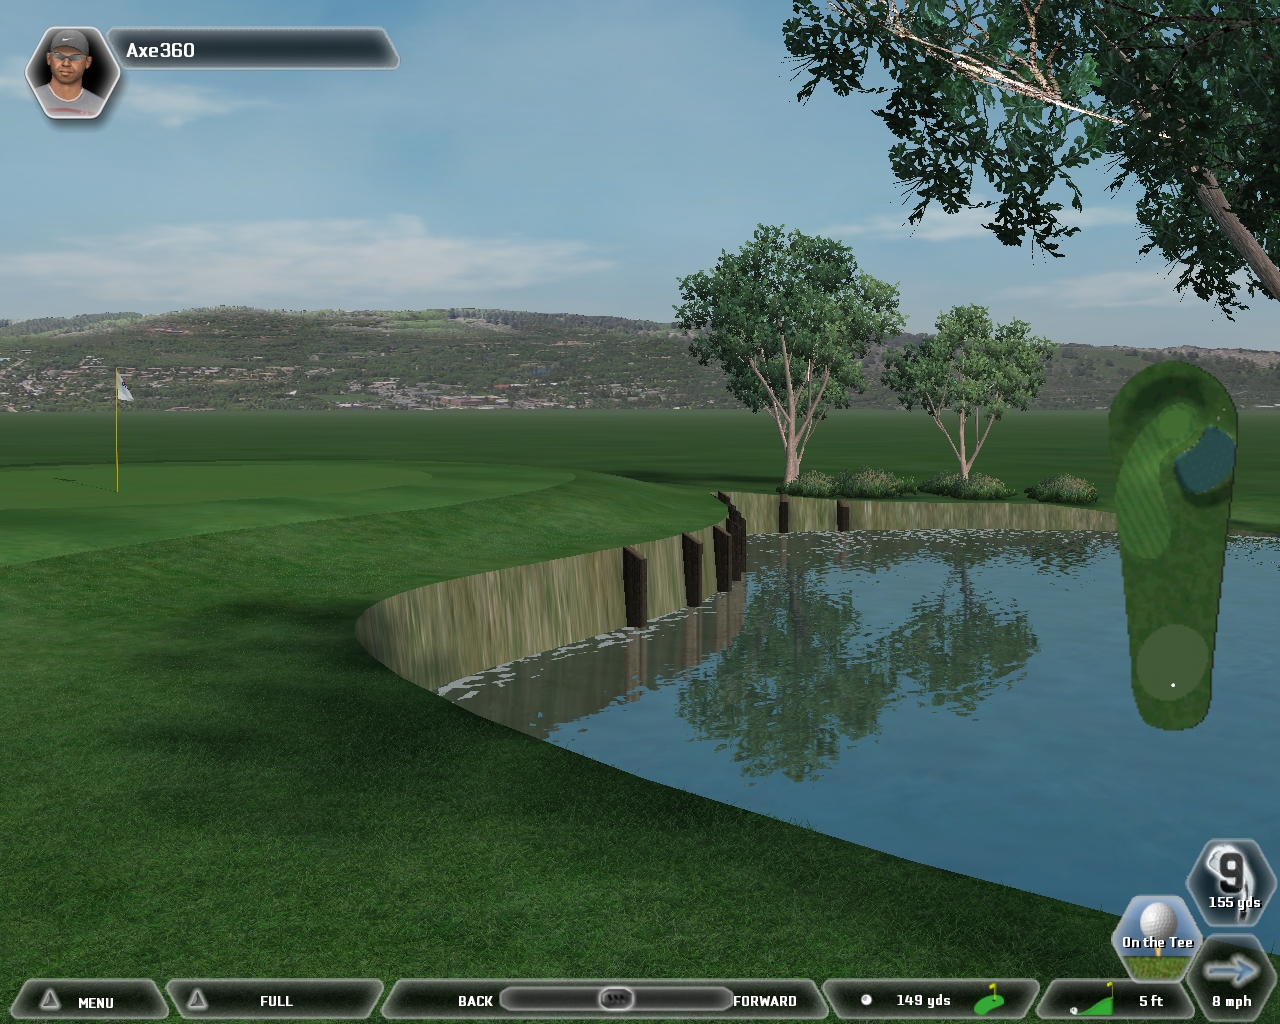
I think I was able to get it but I had to do a couple of things different.
I did everything Roger says but when I made the 2 outer shapes I made them different textures the first is the bright green (;architect) the second was just a bunker cause the color contrast was good..
Then I pulled the bright green texture out some on the low side as in the pic.
Then I chose the bright green (;not the water) and flattened to minimum and no spikes..
Then I continued with Rogers Tut.
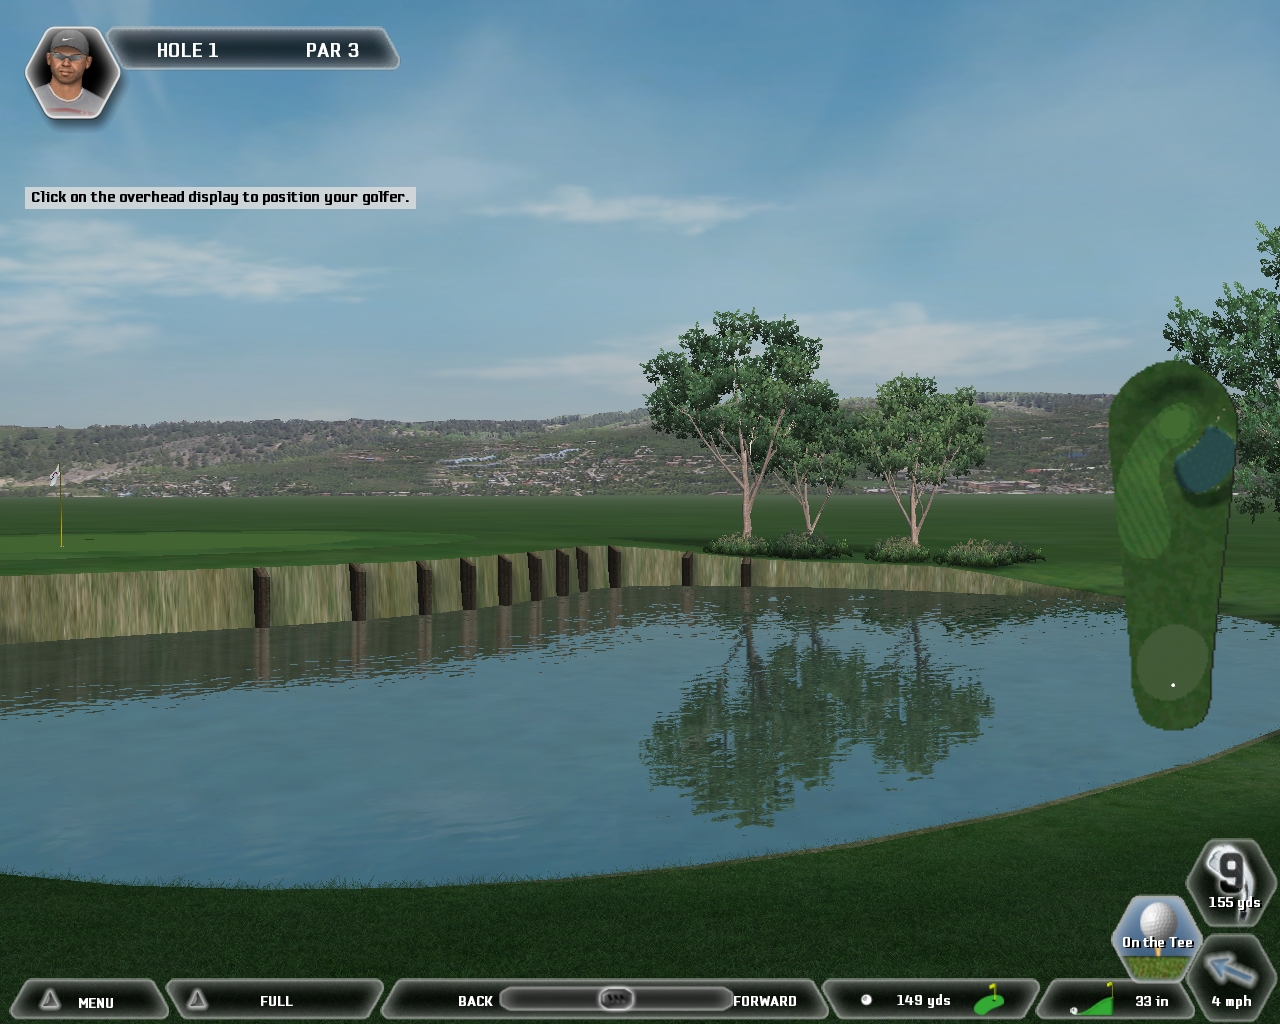
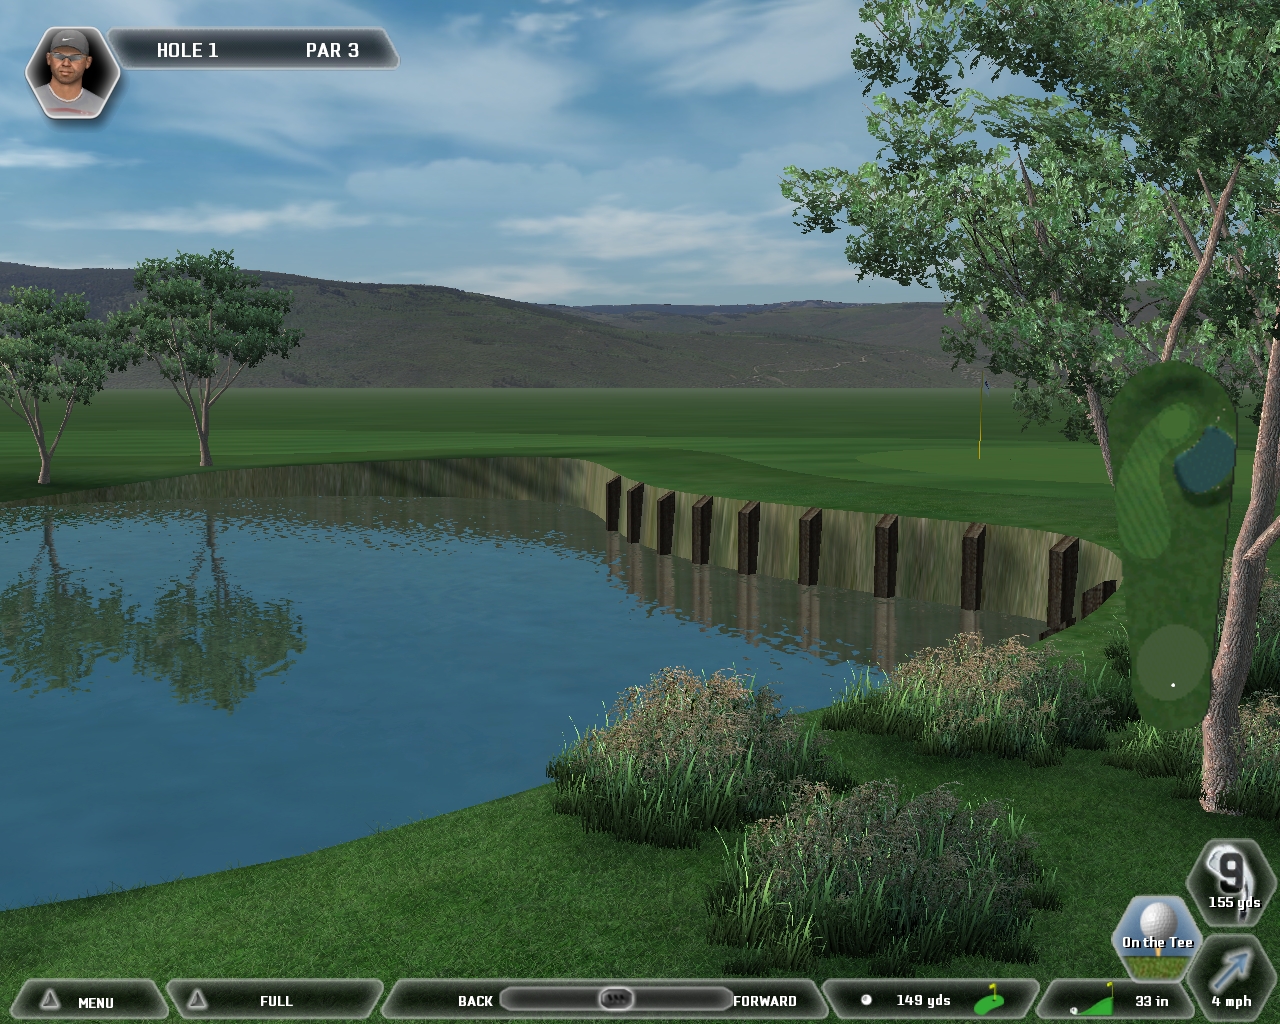
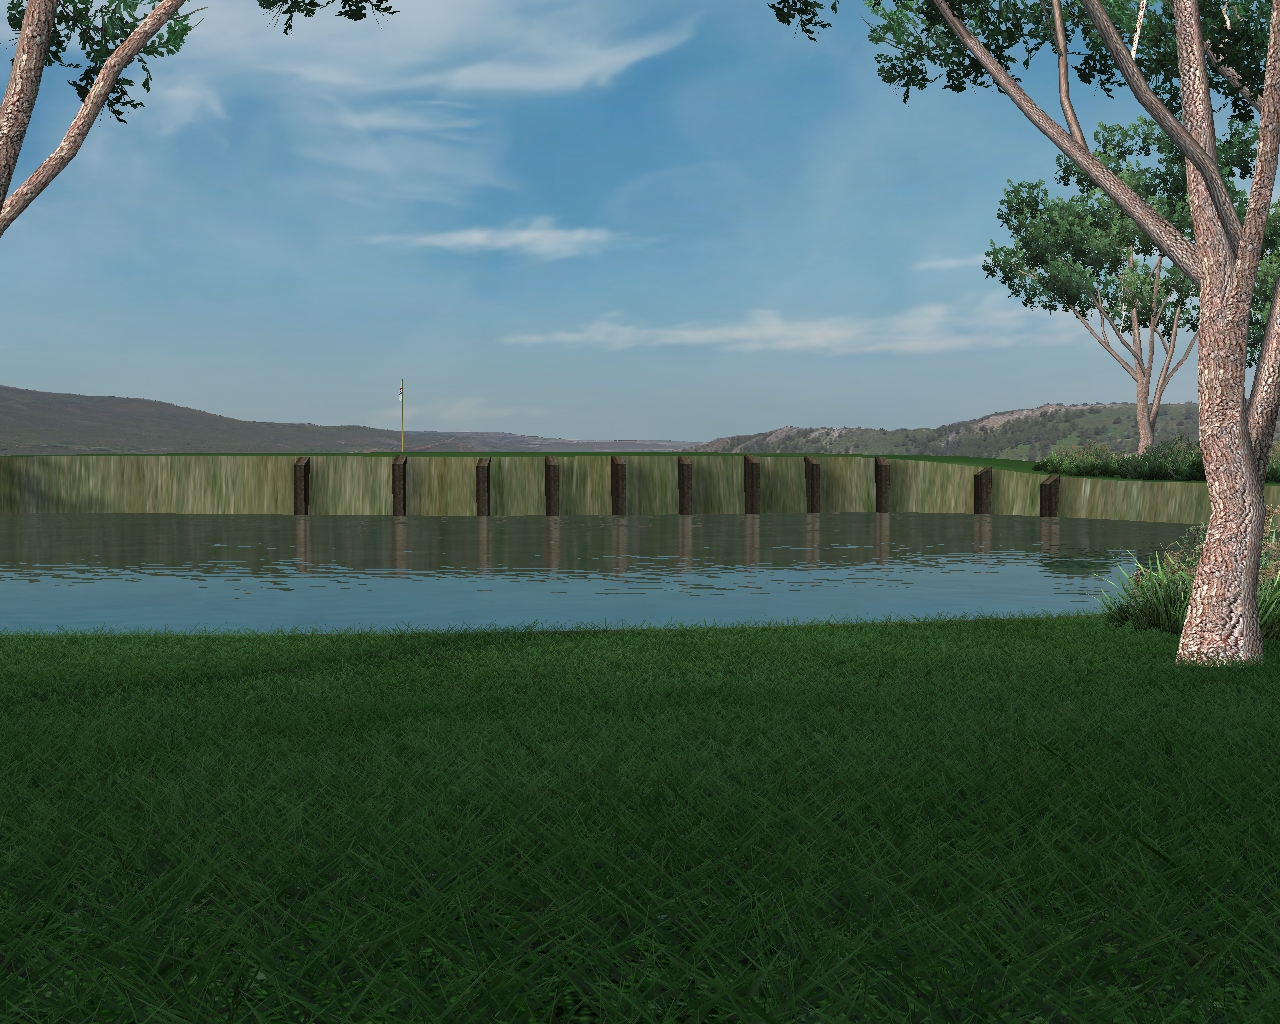
Then I just changed the bright green to the pond texture and the outer most ring to the rough texture and I think It looks ok, mind you I rushed it and didnt finish the pilons but you get the drift.. I hope..
Note: I was able to go back at the very end and raise the green complex as seen in the last pic.. Not as good as Rogers, but with a little more work could be decent..
Another note: I did in fact raise the green complex in the beginning like Rogers tut says but I didnt think it looked raised enough so you can go back at the end and add more elevation but I believe you need to do it in the beginning so you have that drop off for the pond then go back at the end, if you like and raise the green complex some more.. |
| |
|
|
| |
|
|
| |
|
|
|
| |
|
axe360 |
|
General Member |
|
|
|
United States of America |
| |
| Joined: 3/2/2005 |
|
B-Day: 3/26/1960 (65) |
|
Posts: 1,688 |
| |
|
| |
| Posted: Saturday, August 18, 2012 at
7:56:45 PM |
IP Logged |
|
| |
| |
|
|
| |
|
|
| |
|
|
|
| |
|
axe360 |
|
General Member |
|
|
|
United States of America |
| |
| Joined: 3/2/2005 |
|
B-Day: 3/26/1960 (65) |
|
Posts: 1,688 |
| |
|
| |
| Posted: Saturday, August 18, 2012 at
7:57:35 PM |
IP Logged |
|
| |
| |
|
|
| |
|
|
| |
|
|
|
| |
|
axe360 |
|
General Member |
|
|
|
United States of America |
| |
| Joined: 3/2/2005 |
|
B-Day: 3/26/1960 (65) |
|
Posts: 1,688 |
| |
|
| |
| Posted: Saturday, August 18, 2012 at
7:58:24 PM |
IP Logged |
|
| |
| |
|
|
| |
|
|
| |
|
|
|
| |
|
axe360 |
|
General Member |
|
|
|
United States of America |
| |
| Joined: 3/2/2005 |
|
B-Day: 3/26/1960 (65) |
|
Posts: 1,688 |
| |
|
| |
| Posted: Saturday, August 18, 2012 at
8:00:39 PM |
IP Logged |
|
| |
| |
|
|
| |
|
|
| |
|
|
|
| |
|
Bobby Bolin |
|
General Member |
|
|
|
United States of America |
| |
| Joined: 7/28/2003 |
|
B-Day: 5/5/1988 (37) |
|
Posts: 1,427 |
| |
|
| |
| Posted: Saturday, August 18, 2012 at
10:36:16 PM |
IP Logged |
|
I always did this:
1. Make the water shape
2. Enlarge 8 inches and drop wall texture.
3. Enlarge 8 inches and drop same texture.
4. Sink part of the pond however low you want it (3 ft, etc)
5. Enlarge the shape in step 2 4 inches
6. Flatten at minimum
7. Take outermost shape, enlarge 8 inches to a foot to give the feeling of depth
Or
Just keep trying stuff until something works :) |
| |
| |
|
|
| |
|
|
|
| |
|
axe360 |
|
General Member |
|
|
|
United States of America |
| |
| Joined: 3/2/2005 |
|
B-Day: 3/26/1960 (65) |
|
Posts: 1,688 |
| |
|
| |
| Posted: Saturday, August 18, 2012 at
11:34:21 PM |
IP Logged |
|
| Seems like the important thing is, to flatten the first outer shape, not the water..:) |
| |
| |
|
|
| |
|
|
|
| |
|
Bobby Bolin |
|
General Member |
|
|
|
United States of America |
| |
| Joined: 7/28/2003 |
|
B-Day: 5/5/1988 (37) |
|
Posts: 1,427 |
| |
|
| |
| Posted: Sunday, August 19, 2012 at
12:01:35 AM |
IP Logged |
|
| Yeah, that could turn really ugly. |
| |
| |
|
|
| |
|
|
|
| |
|
GolfMikeLK |
|
General Member |

|
|
United States of America |
| |
| Joined: 1/7/2006 |
|
B-Day: 3/14/1959 (66) |
|
Posts: 197 |
| |
|
| |
| Posted: Sunday, August 19, 2012 at
4:31:48 AM |
IP Logged |
|
| edited by: GolfMikeLK on
Sunday, August 19, 2012 at
5:26:00 AM
added |
| |
what I usually do is draw the pond, another shape,5 inches,a 3rd 1 foot, then flatten along countour with 3rd shape,smooth, then what bobby posted.keeps the spikes out.this is the way i do it for putting in wall pieces, not a texture.
rule of thumb, alway make a back up so you can try again if it fails. hope all this helps buss, lot of talented designers in here |
| |
| |
|
|
| |
|
|
|
| |
|
1258thebus |
|
General Member |
|
|
|
United States of America |
| |
| Joined: 7/19/2008 |
|
Posts: 49 |
| |
|
| |
| Posted: Sunday, August 19, 2012 at
9:57:59 AM |
IP Logged |
|
| Well, thanks to everyone's patient advice- Munroco, axe360, Bobby Bolin and GolfMikeLK, I was able to create a pond with the right structure to add wall shapes to. THANKS! Now I can't figure out how to add the wall shapes to create the retaining wall. See attached file. It seems like the shapes are either way too big or too small. How do you size the shapes? I can manipulate shapes' locations, but can't seem to size the shape correctly. In my test pond, the wall is only 12" high. Is that the problem- should it be min 3 to 4 ft high? |
| |
|
|
| |
|
|
| |
|
|
|
| |
|
axe360 |
|
General Member |
|
|
|
United States of America |
| |
| Joined: 3/2/2005 |
|
B-Day: 3/26/1960 (65) |
|
Posts: 1,688 |
| |
|
| |
| Posted: Sunday, August 19, 2012 at
10:17:48 AM |
IP Logged |
|
| edited by: axe360 on
Sunday, August 19, 2012 at
10:26:00 AM
|
| |
Bus, when you have your object selected and on your plot, just right click on it and select the Properties.
Then you will see the Scale selection.. You can make anything smaller. If it is a scale of 1, just put in .9, .8, .7 etc and that will make it smaller.. Hope that helps..
Also when you right clik on the item the box that opens has a Feet and inches selection, this will help you raise or lower the item by feet or just inches.. |
| |
| |
|
|
| |
|
|
|
| |
|
axe360 |
|
General Member |
|
|
|
United States of America |
| |
| Joined: 3/2/2005 |
|
B-Day: 3/26/1960 (65) |
|
Posts: 1,688 |
| |
|
| |
| Posted: Sunday, August 19, 2012 at
10:50:42 AM |
IP Logged |
|
Use the up or down arrows to make bigger or smaller or type in .9, .8 .7 etc. same with feet and inches..
Right clik on the item to open this box.
|
| |
|
|
| |
|
|
| |
|
|
|
| |
|
1258thebus |
|
General Member |
|
|
|
United States of America |
| |
| Joined: 7/19/2008 |
|
Posts: 49 |
| |
|
| |
| Posted: Sunday, August 19, 2012 at
4:04:50 PM |
IP Logged |
|
| In his retaining wall tutorial, Homeboy refers to using a wood or wall texture from the CDA library. Any idea which library he's referring to? I don't see a wood or wall texture in the Architect library. |
| |
| |
|
|
| |
|
|
|
| |
|
Gunpower61 |
 Site Admin Site Admin |
|
|
 Belgium
 |
| |
| Joined: 12/9/2004 |
|
B-Day: 4/30/1961 (64) |
|
Posts: 4,246 |
| |
|
| |
| Posted: Sunday, August 19, 2012 at
4:30:06 PM |
IP Logged |
|
| edited by: Gunpower61 on
Sunday, August 19, 2012 at
4:33:00 PM
|
| |
CDA library is a library created by Homeboy, you can download CDA library on link below:
http://www.coursedownloads.com/coursesource/library.asp?id=1373
Install this library in TW06 with Courseutilities06 or CLSetup06.
After that open Coursearchitect06, and now in the librarian you will find the CDA library.
(; The wood texture is the 5th one on the second row )
(; I think the Wall texture is the 1st one on the second row, not sure though. ) |
| |
| |
|
|
| |
|
|
|
| |
|
1258thebus |
|
General Member |
|
|
|
United States of America |
| |
| Joined: 7/19/2008 |
|
Posts: 49 |
| |
|
| |
| Posted: Tuesday, August 21, 2012 at
11:37:03 AM |
IP Logged |
|
| Thanks Gunpower. Got the library, and am using it. Thanks to all in the forum who helped me acquire a new course design skill! |
| |
| |
|
|
| |
|
|
|
 Post Reply
 New Topic